
การลงทะเบียนเรียนใน Au Spark
Pre-registration At-a-Glance
AU Spark introduces a new feature for pre-registration that allows you to plan your class schedules online and save those schedules for your pre-registration time slot. It is highly recommended that you plan your class schedules ahead of time so that you will take a short amount of time during your pre-registration time slot. The schedule planning will be open 24 hours a day on 20/6/2015 – 21/6/2015. You can get in at any time. If the server becomes busy or slow, please be patient or come back later when there are fewer students online in the system.
On any pre-registration days, only students that are allowed to pre-register can log into the system to complete their pre-registration. You can still create new schedules if those you create earlier become full. The rest will get a message “You are not allowed to login at this time”. At night (6 p.m. – 6 a.m.), everyone can log in to the system again to check availability of your selected schedules. You may need to replan if those schedules you selected become full.
Note that the old pre-registration system will be inactive. You must pre-register via AU Spark only.
Please like and follow AU Spark Facebook page for more information and announcements (seach “AU Spark” on Facebook).
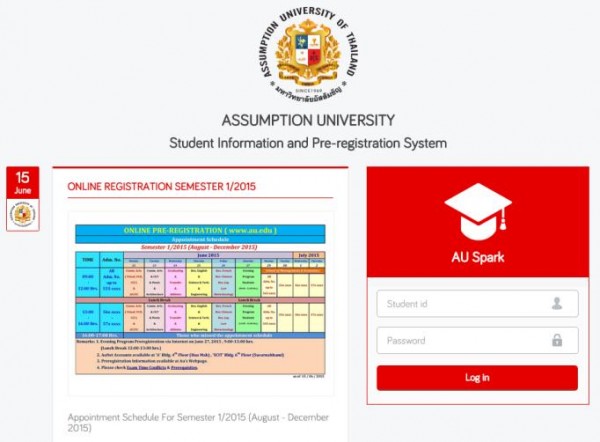
STEP 1: Go to http://www.au.edu/preregistration using Google Chrome
Tip:
Make sure you have a good Internet connection
STEP 2
Log in to the system using your AU
STEP 3: Verify your identity
Tip:
– Be careful when you and your friends are using the same computer to pre-register.
– Make sure that it is you who are pre-registering.
– If it is not you, click “Log out” button and log in again.

STEP 4
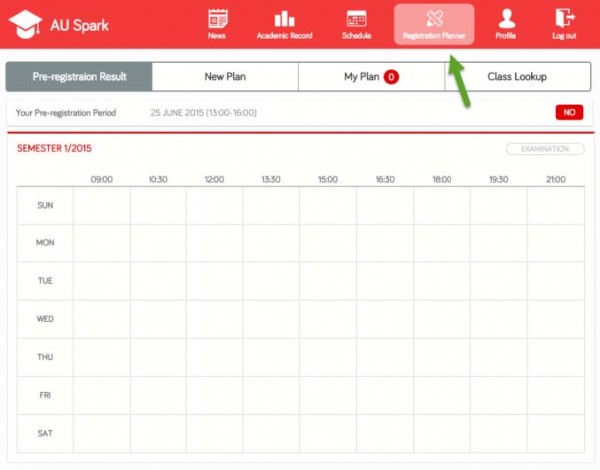
Click “Registration Planner” menu
AU Spark will display your pre-registration period and result (if any) in the first tab.
STEP 5
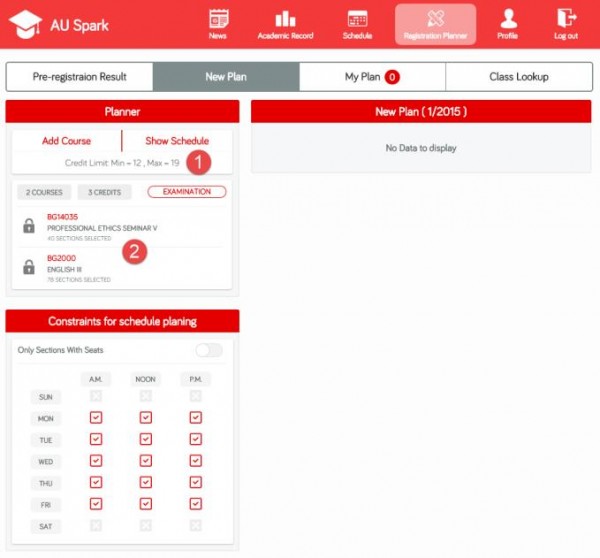
Click “New Plan” tab to start your course planning
(1) Your minimum and maximum credit limit will be displayed. Make sure your class schedule is within this credit limit range otherwise you will not be able to pre-register
(2) The pre-defined courses that you must register will be displayed. You cannot delete any of these courses
– Ethics Seminar will be selected based on your current year and semester of enrollment.
– English course will be selected accordingly if you have not completed English IV.
STEP 6
Click “Add Course” button to add a course to your plan
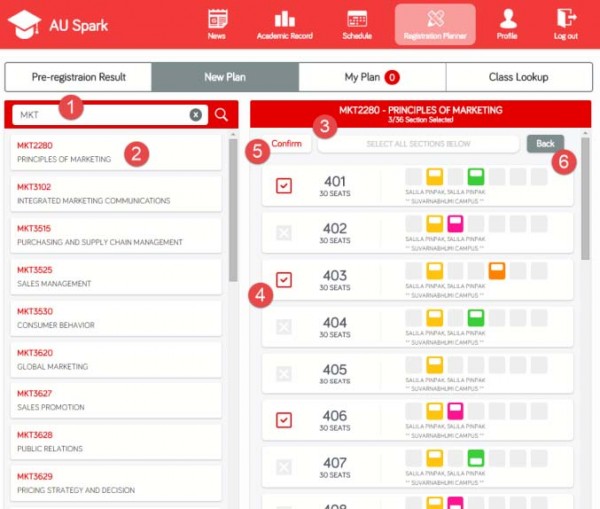
(1) Type the course code or course name to search for your course
(2) Select the course you want
(3) All sections for the course you select will be displayed on the right
(4) Select the sections you want
(5) Click “Confirm” to add this course and selected sections to your plan
(6) Click “Back” to cancel this course
Tips:
– You can select just one section if you have a specific section in mind.
– You can select as many sections as you like or select all sections if you have no preferences. Although this allows you to explore various class schedules, it will be slower for AU Spark to generate all possible schedules for you.
STEP 7
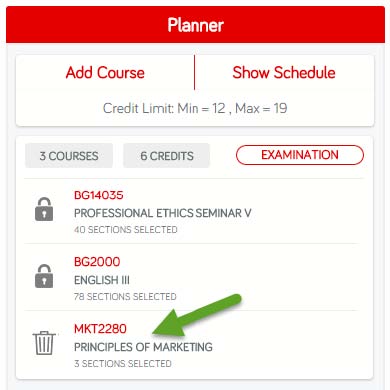
Verify the course and number of sections you just add then repeat STEP 6 for the rest of your courses
STEP 8
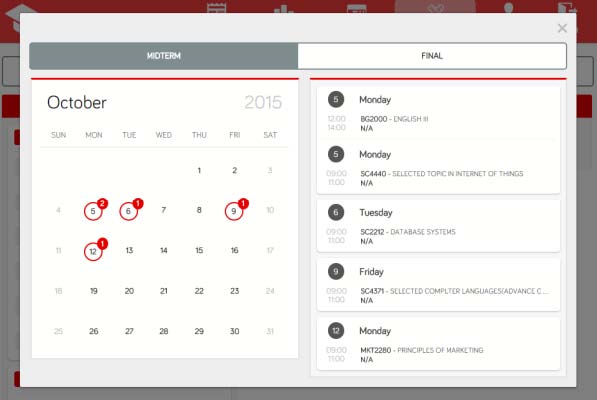
Click “Examination” button to see midterm and final examination schedules
Tips:
– You are not allowed to pre-register the schedule that has examination time conflicts.
– In such a case, you have to remove some courses to avoid examination time conflicts then proceed with the pre-registration.
– You have to submit a petition form to the Office of the University Registrar to add additional courses that cause time conflicts during the add/delete period.
STEP 9
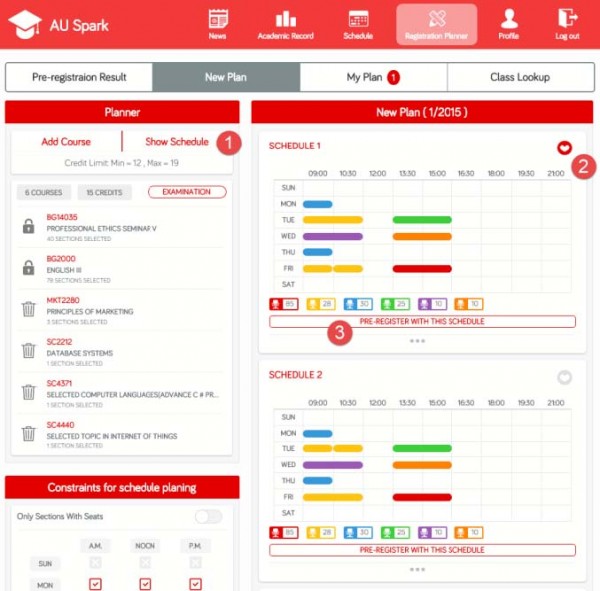
Click “Show Schedule” button to see all possible class schedules
(1) Click “Show Schedule” button, all possible schedules (upto 50 schedules) will be displayed
(2) Select the schedule you want with the button
(3) If you are doing this during your pre-registration time slot, you can click “PRE-REGISTER WITH THIS SCHEDULE” button to complete you pre-registration with the schedule you select
Tips:
– When you have several sections selected in the plan, there will be several possible schedules but AU Spark will show only 50 schedules.
– To get less number of schedules, you have to choose fewer sections. This will also give you schedules that better fit your needs.
STEP 10
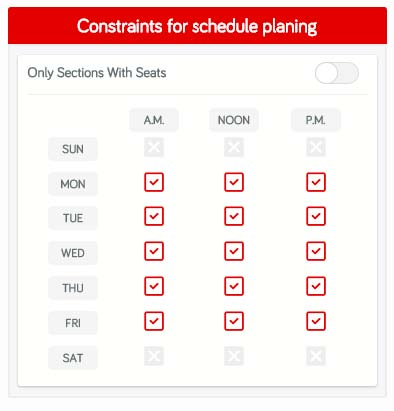
Modify your constraints to search for better schedules
When there are so many possible schedules available, you can modify your constraints by selecting only your preferred days and times. Then, you can click “Show Schedule” again to see better results.
Tips:
– Turn on “Only Sections with Seats” to get rid of sections that are already full
– Click on a specific day to toggle selection of all times for that day
– Click on a specific time period (A.M., NOON, or P.M.) to toggle selection for all days
STEP 11
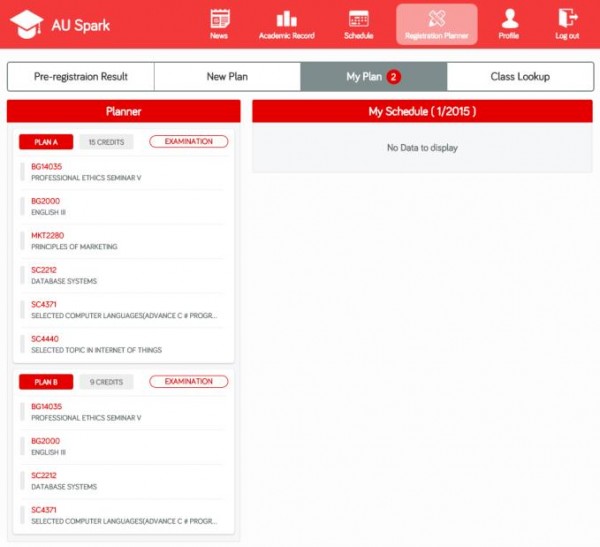
Click “My Plan” tab to see all your plans and schedules
You can add as many plans as you like. Plans are varied by the courses you select, not sections.
STEP 12
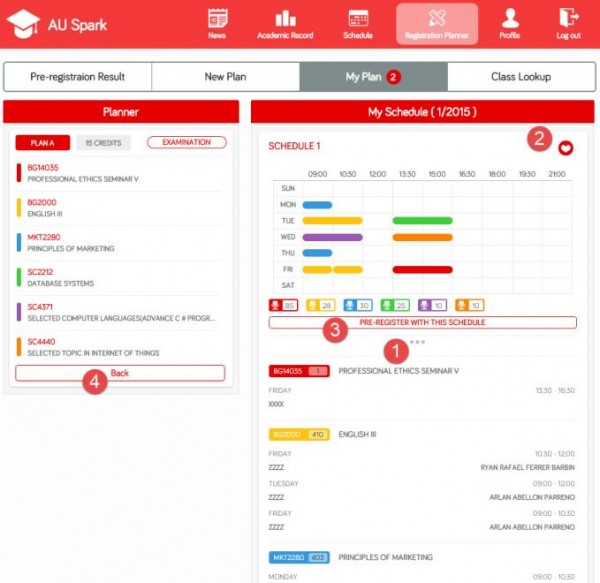
Click on any plan to see class schedules you selected
(1) Click “…” button to sections detail of this schedule
(2) Click the button to remove this schedule from the plan if you want to
(3) If you are doing this during your pre-registration time slot, you can click “PRE-REGISTER WITH THIS SCHEDULE” button to complete you pre-registration with the schedule you select
(4) Click the “Back” button to go back to your plan list

Trouble Shoots
Log In Problems
For those who cannot log in, there are 4 possible cases:
1. You put ID and and password but the page does not seem to go anywhere.
–> The browser you are using might not support our web. The one that is proved to be working correctly is Google “Chrome”. It works on both desktops and mobile devices.
2. “Incorrect ID and/or Password”
–> Make sure your ID and password is correct. Your ID has to start with a “u” or “U”. You can verify your AU account validity at the Information Pool system (www.eai.au.edu). If you cannot log in there, please contact the ITS office at IT building 2nd and 6 fl (Suvarnabhumi) or C building 7th fl (Hua Mak).
3. “IDM server does not respond”
–> This occurs when the university’s central authentication server is down which might be temporary. Please try again a few minutes later.
4. “You are not allowed to log in at this time”
–> This will happen during the real pre-registration period, starting June 22, 2015. It means that you have to wait for your designated time slot for pre-registration to log in to the system. However, you can get into the system during 6pm – 6am on any days to plan your schedule(s).
1.jpg)


Responses